Note - The tool tips script is by default disabled. If you wish to use it you must enable this script in the template's configuration area. This also includes site shaper installations.
Demo 1:

Demo 2:
Demo 2 Image Tool Tip
Demo 3:
Demo 3 Image Tool Tip
This template comes loaded with options that you can use to customize your site exactly how you want it. Here's how to get to these custom settings:
- In the backend of Joomla go menu item Extensions/Template Manager.
- Click on the title of the template.
- This will bring you to the template manager screen where you can edit the template's parameters.
- Click save when you are done
I like what I see! I want to JOIN TODAY.
All content and images shown on this site is for demo, presentation purposes only. This site is intended to exemplify a live website and does not make any claim of any kind to the validity of non-Shape5 content, images or posts published. Stock photography and icons were purchased from shutterstock.com for this demo only, and is not included with this template. You may not use these items for your own use without first purchasing them from their copyright owner. Links will be provided for some images if you wish to purchase them from their copyright owners.
This template is built on the very powerful S5 Vertex Framework, which comes packed with amazing features! Learn More About Vertex...
Every template built on Vertex also comes with its own unique template specific options applicable to that particular template such as highlight colors, social icons, and much more. These features are in addition to the standard functions of Vertex, and are still controlled through the very user friendly interface of Vertex. This page will document the features specific to this template.


Every template built on Vertex also comes with its own unique template specific options applicable to that particular template such as highlight colors, social icons, and much more. These features are in addition to the standard functions of Vertex, and are still controlled through the very user friendly interface of Vertex. This page will document the features specific to this template.
Template Specific Configuration Interface of Vertex
Below is a screenshot that shows all the template specific features available in the user friendly Vertex admin:
Custom Module Gaps
This template comes with the ability to change the side gap and bottom gap between modules. You can set the gap from 0px to 30px. This demo by default shows each module with a 1px gap, and the image below shows the modules with a 20px gap. Because the top_row1 and bottom_row3 sections have a unique background you can control the modules in these sections separately. This is all done very easily through drop down menus in the backend of Vertex.
Custom Highlight Colors
Set your own custom color scheme with the built in highlight colors. Highlight1 primarily controls the buttons, title, menu background, etc. while highlight2 mostly controls the hover over color for buttons as well as a highlight module class suffix. You can set these colors to any color that you want.
Optional Highlight Color On Module Titles
The first word of some module classes is highlighted with the custo highlight1 color. This feature can easily be disabled as shown below.
Custom Header Image
Easily apply any image that you would like as a custom header image for your site. The image will automatically stretch to fit, but it should be relatively large to begin with, between 1500px and 2000px is a good width to use. We recommend matching the custom background color option to match your header image, but you do not have to.Custom Highlight Fonts
Choose a custom highlight font powered by Google fonts. You can set a custom font for the S5 Flex Menu main level items, titles, buttons, and much more. This is used in conjunction with the default site font which is controlled under the Layout tab of Vertex, and controls many elements as well.
Social Icons
Easily link to a social media site with the built in social icons found in the header of this template. Simply enter the url of your social site in the configuration and the icon will automatically appear. To disable an icon simply leave the url blank for that particular icon.
Uppercase Leters
Choose to enable or disable uppercase letters on most menu items, buttons, titles and more.
Small Menu
The S5 Flex Menu gives you the ability to have subtext on each menu item. If you choose not to use subtext on the first level links simply choose to disable this option and the menu will automatically down size.
So what are Site Shapers? They are quick installs of Joomla combined with all the modules, content, etc used on our demo, excluding stock photography. Within a few minutes you can have your site up, running and looking just like our demo. No more importing SQL dumps and installing modules. Just head on over to the download section of this template and grab a Site Shaper. Simply install the Site Shaper like any other Joomla installation, it's that easy!
How to setup a Site Shaper
- Login to your cpanel or your server admin panel.
- Locate the area where your databases are (usually labeled Mysql Databases)
- Create a new database
- Next create a new database user and assign it to this newly created database in the previous step
- You will then need to extract the site shaper to either a folder on your server or the root directory such as WWW. NOTE: if you already have a website in the root of your WWW folder, we suggest creating a new folder and extract the site shaper there. If your cpanel does not have an extract option or you cannot find it, you may also extract the contents of your site shaper in to a folder on your desktop and upload all the files via an ftp client to your server.
- Next, navigate to the url where you extracted the site shaper via your web browser.
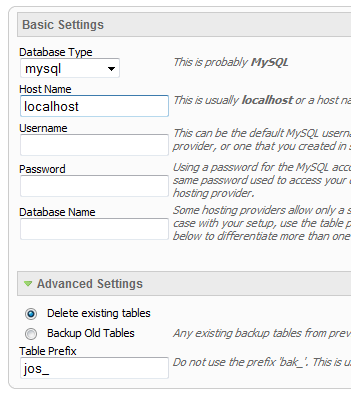
- Continue through each screen until you reach the below screenshot:
- At the above screen be sure to enter localhost as shown, continue to fill in the following text fields with your newly created database and username information
- Follow through the rest of the site shaper setup and click the install sample data at the last screen and the installation is complete! (be sure to rename/remove the installation directory after finishing the install)